Showing posts with label pattern. Show all posts

Sunday, October 26, 2014

Easy Cinch Bag Toy Storage - Step By Step Tutorial

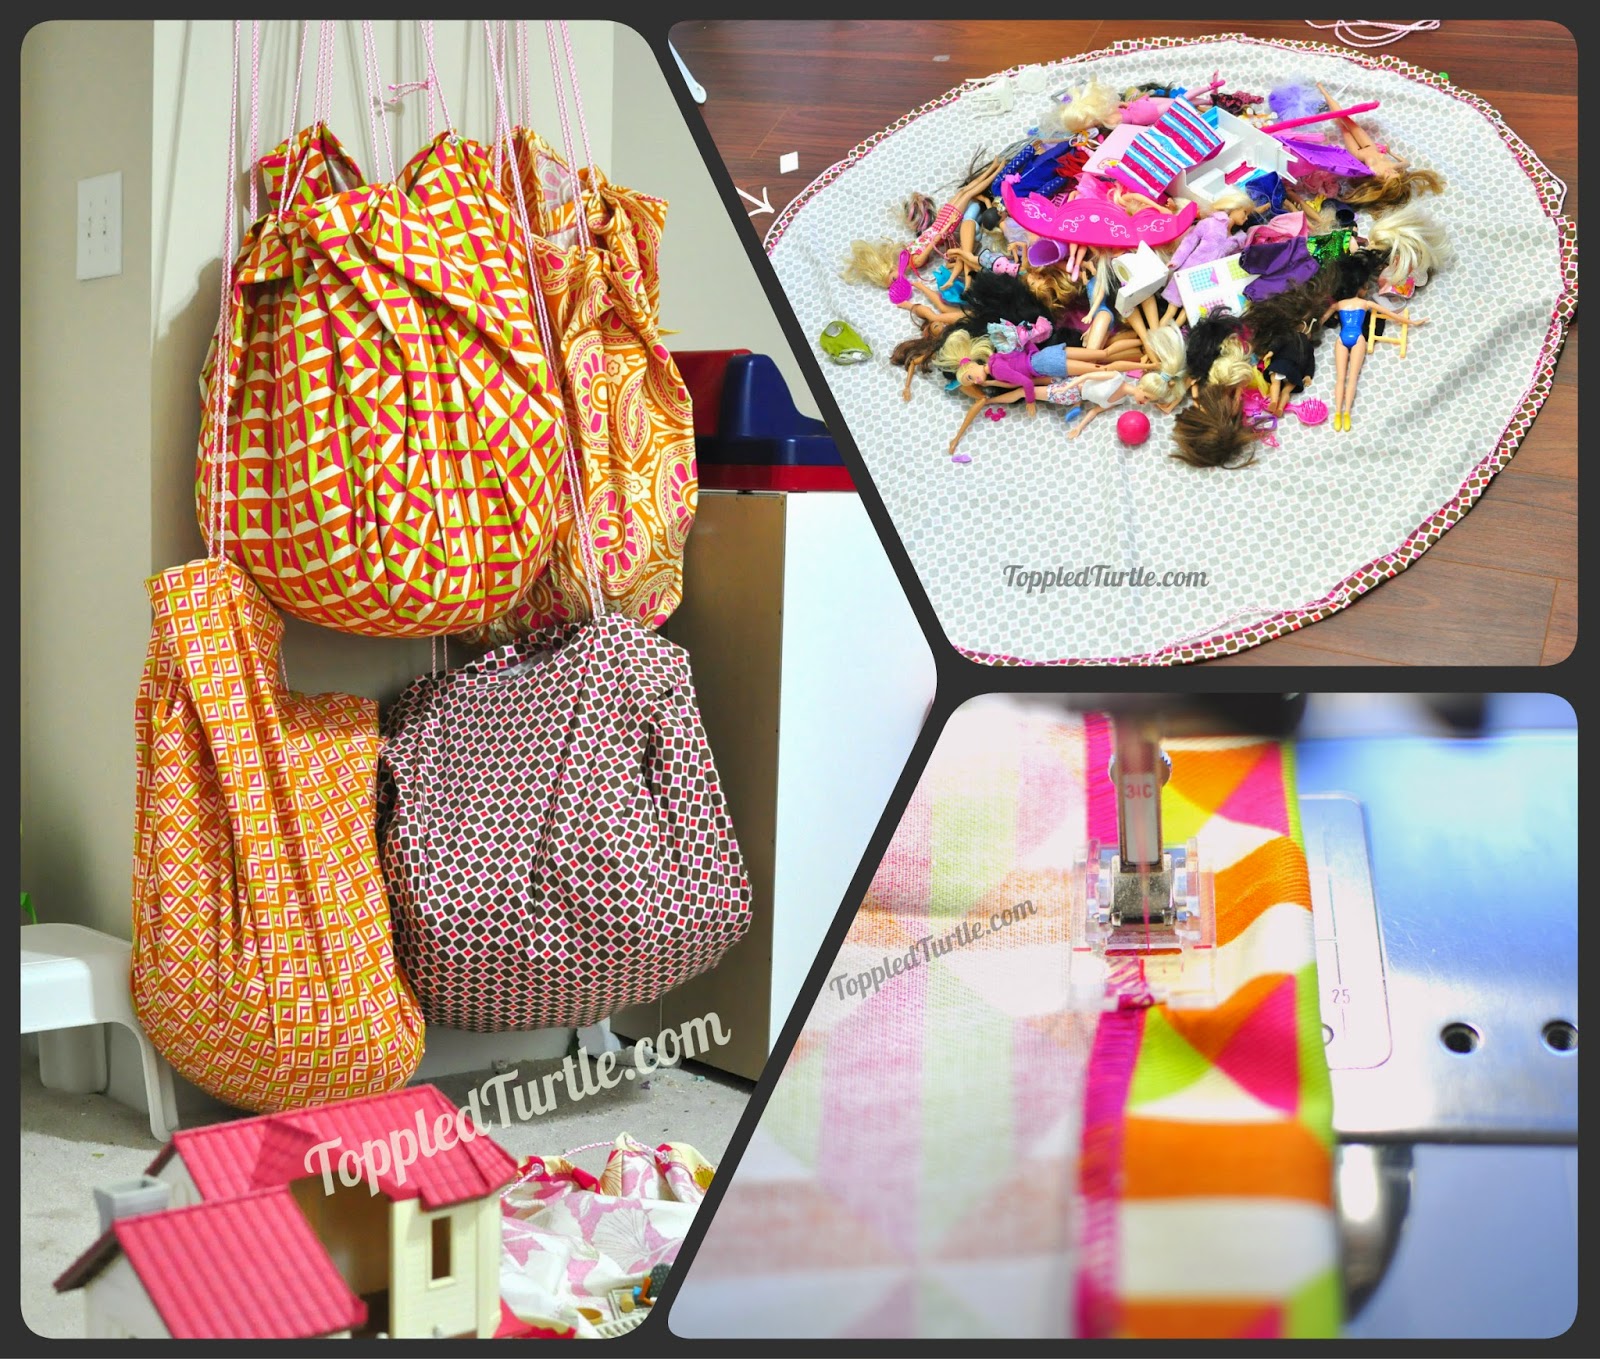
In this step by step cinch bag tutorial, I'll show you how to create easy cinch bags for DIY toy storage that also double as a play mat, making play and clean up a breeze!
 
Cinch Bag Play Mat
My kids have too many toys!


 When I was younger, I remember my brothers had an amazing Lego collection. It wasn't their Legos I admired, however, but the storage bag. It was made of denim and rope. Whenever they wanted to play, they just pulled the bag down, let it fall open, and they had a ready-made mat. No pieces all over the floor, no hours of clean up. When they were done, they just pulled on the rope and hung the bag back up. My sisters and I were not so lucky, spending hours cleaning up Barbies and other various toys with miniature pieces. Now that I'm an adult, with kids of my own, I covet that play mat bag all the more! So, this weekend I set about making some for my girls to make play and clean up more enjoyable. I made some mistakes with my first attempt, but in the end, we have 5 great bags and a clean room!

So, let's get down to business. The supplies:


Supplies

1.5 yds of 54" wide fabric (trust me when I say a typical 36" wide fabric makes too small of a bag - remember those mistakes I mentioned....you could probably do 45" wide if you want a smaller bag, however)
16 - 1/4" eyelets
Rope
Tape Measure
Hammer (for eyelets)
Marker (whatever your favorite method of marking fabric)
Rotary Cutter and Mat (or scissors)

Let's discuss the rope for a minute...hubby bought the rope I used in this project at Home Depot. I used 2 bag's worth to make 5 cinch bags. I tried cording rope (from fabric store) for my trial and quickly discovered it was just too "sticky." This alternate rope is nice and smooth making it glide nicely for easy, kid-friendly cinching! The bonus is the price: $5 for the bag!

Rope from Home Depot
Ok, let's discuss the steps involved.
1. Fold your fabric into quarters so that all of the folds and raw edges line up (fold in half lengthwise, then in half widthwise - or vice versa)

2. With a tape measure, mark fabric at 28" from folded corner around in a semi-circle always careful to measure from the corner where all of the folds come together (you can modify this to 25" or 26" if the fabric store was stingy and gave you exactly or less than your 1.5 yds or cut your fabric crooked - I was able to cut all of mine at 28" with a little room to spare even)
Fold and mark a semi-circle cut line

3. Use your rotary cutter to cut the semi-circle (or scissor if that's your preferred method, but since your fabric is quartered, I'd recommend a quick pinning if you go the scissor route to keep it all lined up)

A semi-circle unfolded = CIRCLE!
4. You now have a perfect circle (note: if you've ever considered making a circle skirt, you're halfway there already! Just cut a smaller circle from your corner fold, serge, hem and done! There's math involved for that center circle and I love this little tutorial for it). Whoa! Off course! Sorry!

5. Run that perfect circle through your serger. Don't have one? Don't fret, run a zig-zag stitch along the inside edge or use pinking shears to make your original semi-circle cut.
secure your raw edge however you prefer, but don't skip this step -
you want your bag to last, right?!
My mannequin got a workout!

6. Fold over and sew approx. 1" hem around the entire edge. You can be a perfectionist and press first, but who has time for that? Since you're sewing around a circle, you will need to allow for a fold in your hemline to account for the difference in circumference from outer edge to your sewing line (1" in). Just allow the fabric to fold over itself every couple of inches to accommodate this. It's really no big deal - don't let it stress you out!
See the pucker building up? Just fold it over itself and sew right over it. See, it's ok!
7. Eyelet time! You're almost done, though this is, admittedly, the most tedious part of the process. I found it easiest to quarter my fabric again rather than measure all the way around the circle. With the fabric quartered, mark each fold as an eyelet location. Then, measure approx. 10" away and mark, marking every 10". I say "approx." because this will depend on your exact circumference. Mine had about an inch extra that I just spread out between each placement. No need to get out the calculator or complete advanced calculus - approx. is just fine!
The arrows indicate where the eyelets will go.
 
8. Install the eyelets on each layer. You can measure and mark just the top layer, but make sure to actually install an eyelet on each layer individually. Like this:
Quartering the fabric before measuring will save you time and energy on installing
the eyelets. One measure, one mark, but install on each layer individually
Close up
(no, you're eyes are not deceiving you, it is a different fabric)

9. Thread the rope through the eyelets. If you've done it right, there should be the perfect number that both ends come out the same direction. Be sure that there is enough rope that the circle can lay open flat (this is the play mat, too, remember!) and secure the ends together.

10. Load up the toys!
Feed the rope through with enough slack that the circle can lay flat
11. Pull up the rope from opposite sides of the circle to cinch and you're all set! Play, cinch, and hang your way to a cleaner play area!
In action. 4 bags hanging and 1 open for play
(see how huge some are - I need to pare down the doll accessories and Barbies!)
 
(Note: the top bags are the same size, just pulled up by 4 sections of rope to layer them on the hooks)

I hope you've found this blog useful! I love comments and reply to questions when asked, so ask away! Best of all, enjoy your clean play area!

Sunday, September 1, 2013

Bias Striped Knit Baby Blanket - Free Pattern


BIAS STRIPED KNIT BABY BLANKET
Super easy, fast, and fully customizable!

Recently, I was asked to knit a baby blanket for an upcoming baby shower. Naturally, I started scouring Ravelry and Pinterest and the Internet in general for ideas. I came across a lovely blanket at Rust & Sunshine and fell in love with the overall look. I thought I'd hit the jackpot when I saw a link to a pattern, but, as luck would have it, the pattern had been removed. "Oh, well," I thought, "I'll just write my own." And, because I like to share, the pattern below is for free. However, I ask that this only be used for *personal* use and not commercial use. This pattern is fully customizable to whatever yarn & size you desire. I used a bulky weight yarn and changed color every 4 rows - it knit up quite quickly! Gauge is unimportant, except for the binding - instructions for figuring out how to adjust the binding for your project are included. Enjoy!

Bias Striped Knit Baby Blanket

*PERSONAL USE ONLY*

Yarn: Knit Picks Biggo Yarn. I used 3 hanks each of Wonderland & Bare and 2 hanks of Dove, with plenty left over for a matching hat or two!
 
Needles: Size 11 circular needles (40 inches) & size 10.5 circular needles (32 inch)
 
Gauge: Unimportant
 
Finished Size: approx. 30x30, but you can make your as large as you'd like.
 
Abbreviations:
kfb - knit into the front and back of the stitch
k2tog - knit 2 stitches together
 

Instructions:

With size 11 circular needles, cast on 4 sts.
Rows 1-4: kfb of 1st st, k to end
Row 5: change color, kfb of 1st st, k to end
Rows 6-8: kfb, k to end
Repeat rows 5-8 until side measures your desired length, changing colors every 4 rows. Carry your alternate color yarn up the side of every odd row by twisting the two colors each time you begin an odd row.
 
Begin decreases:
Row 1: On next color change row, k2tog, k to end
Rows 2-4: k2tog, k to end
Repeat decrease rows 1-4 until you are back down to 4 sts, continuing to carry your alternate color yarn up the side.
Bind off purl-wise.
"Right" side without binding. You could stop here, but the sides where you carried the yarn look a little less than finished, so keep that in mind.

"Wrong" side, which I actually completely and totally love!
 
 
Binding:
Here is where you need to worry about gauge, but only to figure out how many stitches you'll need for the length of your blanket and your unique gauge.
 
Here's how: Knit a swatch in k2, p2 ribbing, using 10.5 circular needles.
Measure your gauge by counting how many stitches across = 4 inches. Its best to measure in 4 inch increments because gauge can vary a little depending on where you measure, so taking a 4 inch area helps average out the differences and will increase the likelihood you'll have an accurate measurement.
In my case, my gauge was 18 sts = 4 inches.
Now, divide that by 4 to find out how many sts per inch (4.5 sts per inch for me).
Now measure the length of the side of your blanket and multiply it by your gauge.
So, my blanket is 27" (it should be a square). 27x4.5 for my ribbing gauge per inch = 121.5 sts. Obviously, I can't knit 1/2 a stitch and because I'm doing a k2, p2 pattern, I want an even number so I'm going to round up to 122.
 
So, for the binding, I'm going to pick up 122 sts across one side of the blanket. (You pick up however many stitches you figured out above!). The best way to evenly space these picked up stitches is to put a marker at the 1/2 waypoint (I like to also put them at the 1/4 waypoints too) and then keep track of how many stitches should fill that space.
 
After you've picked up your necessary number of stitches:
Work 5 rows of k2, p2 ribbing.
Bind off in pattern (k the knit stitches and p the purl stitches)
 
Repeat on the opposite side.
Here it is with binding added to 2 opposite side.
Now, you'll have to do a teeny bit more math as your measurements for the remaining sides have changed with the addition of the binding. In my case, the binding added 3" onto the measurement. So, 30" x 4.5 gauge = 135 sts. Because I need an even number for the ribbing pattern, I picked up 136 sts evenly spaced across.

Just as before, work 5 rows of k2, p2 ribbing
Bind off in pattern
Repeat on opposite side.

Weave in all ends. Enjoy!
All finished. I absolutely love the way this yarn knit up. Its soft as a cloud, yet sturdy and "clean" looking!

Here's how the edges of the binding come together.


Wednesday, June 1, 2011

Seriously cute, simple, panel skirt (photo tutorial)


I was out with the family this past week and saw a little girl wearing the cutest little skirt. I fell in love and knew I needed to make some for my girls. We immediately ran across the street to the fabric store, picked out some fabric. A little planning and a couple of naptimes later, each of my girls have their own panel skirt for the summer. I am extremely pleased with the way these came out and hope you enjoy making one for your own little love.
Below, you will find a picture tutorial for this skirt. Warning, its very picture heavy. I made it in toddler size 2-3 and 4-5 and have included the cut measurements below.

Disclaimer: This pattern/tutorial is being presented for personal use only. A lot of time and effort went into planning and creating these skirts and this tutorial. Please be respectful and do not utilize this tutorial to make items for sale. Thank you.

Supplies:
6 different fabric patters (5 for the panels and 1 for the yoke/waistband and bottom trim)
1/2 yard of Fabric A (for yoke & bottom trim)
1/4 yard of 5 additional patterned fabrics (these will be cut into a total of 10 strips and then pieced together to make the main part of the skirt)
Elastic (I used 7/8 in wide non-roll elastic)
Thread to match fabric

Cuts:
Size 2-3T                                                                 Size 4-5T
Fabric A: 1 strip 5.25 x 26 for yoke/waist                 Fabric A: 1 strip 6 x 28.5 for yoke/waist
               1 strip 3.25 x 51 for bottom trim                1 strip 3.5 x 56 for bottom trim

Fabric B-F: 2 strips each 7.5 x 6                               Fabrics B-F: 2 strips each 9.5 x 10

Elastic: 17.5 in                                                          Elastic: 19 in

Skirt Construction:


If you have a serger or sewing machine with an overlock stitch, start by overlocking all edges of your cut pieces. This will help keep the selvages from fraying and prolong the life of your skirt. (If you don't have this option, don't worry, we're going to topstitch all of the seam down, which will also serve to prevent any fraying of the edges.)


 You may have to piece to sections of fabric together to get the length required for the bottom trim. If so, sew the pieces together first, then press the seam open, and then overlock the raw edges. This will ensure that the seam is sewn into the garment pressed open, which will reduce bulk.

With the right sides of the fabric facing each other, sew all of the strips of Fabrics B-F together using a 1/2 inch seam allowance to form one long strip of fabric. Then join the two ends of the long strip of fabric together to form a loop.


Now its time to head over to the ironing board and get friendly with your iron

Press all of the seams down, ensuring that they all face the same direction. (You are not pressing the seams open for this step.) Set this aside and move onto the yoke/waistband.


Fold down approx 1/4 inch of the top edge and press.


Fold down approx 1.25 inches, encasing the above .25 inch in between the right and wrong sides of the waistband. This will be the casing for your elastic, so hold up the elastic to be sure you're not undersizing your casing.


Press your 1.25" casing down. (If you've done this right, you shouldn't be able to see your overlocked edge)


Let's head back to the sewing machine.


Gently unfold the 1.25" casing and sew together the two ends of the yoke/waistband to form a loop. (You CAN do this step before pressing down the casing for the elastic, but I find it easier to do it in the order presented - just a matter of personal preference).


Sewing closely to the edge of the casing fold (so you can catch that 1/4 fold underneath), sew the casing down, but leave about 1 -1.5 inches unsewn. This is where you will feed the elastic, when the time comes.

Here's our cute little opening into which we will feed our elastic.

Ok, now all of our pieces are almost ready to go (the yoke/waistband, the center strips of fabric, and the bottom trim). Now let's move back to our stripped piece and work on tacking down all of those seams.


Now we are going to topstich the seams down. This serves 2 purposed: to keep the edges from ravelling and to preserve the integrity of the seam after washing. (You *can* skip this step, but you'll find all of the seams will be pointing in every which direction after a couple of washes. While it doesn't affect the function of the skirt, it makes for an untidy and unprofessional finish.) Oh, and sorry for the orientation of this photo...blogger is not playing nice with this pic.


 Here is what it'll look like for the wring side after you've topstitched down the seams. The stitch line on the left is from piecing the skirt together and will not show on the front of the skirt. The stitch line on the right is from topstitching the seam down and WILL show on the front of the skirt.


 Now its time to take the bottom trim and pieced section of the skirt and line up the edges (with the right sides of the fabric facing). Now that their lined up, pin them together. No seriously, PIN them. I'm generally the one to skip the pinning, but it will make your life a lot easier to have it pinned before you try to sew it together. Go ahead and sew it together.


Press the seam down toward the bottom trim. Then, press approx 1/4 and then another 1/4 down on the bottom edge of the trim (using the same method we did with the casing for the elastic).

Topstitch the seam down and sew the bottom edge very close to fold line (see arrows)


Look at what you've accomplished!! YAY!!


Ok, now, if there *is* a "hard part" to this skirt, we're about to tackle it. Its reall not all that hard, but does require a wee bit more patience than the rest of the skirt. At this point, you will notice that the main part of the skirt is significantly wider than the yoke/waistband. This difference will give the skirt that flowy look that's important to every little princess out there.


So, let's get ready to gather the top of the skirt to bring it into the same measurement of the yoke. You can do this my hand, but my motto is "why do it by hand, when I can do it in less time on the machine". So, start with pulling out at least 3 inches of thread (both upper and lower).

Set your machine to the longest straight stitch possible. We only want to baste here, not actually sew it for keeps. Baste the top edge of the skirt at 1/4 in and 5/8 from the top edge (this is assuming you are using my 1/2 inch seam allowance. If not, then sew 1/8" on either side of where your seam allowance will be). Here's what it looks like with both lines basted.


Now, pull the thread to roughly gather the top edge of the skirt. Try to ensure the gathering is fairly even across the entire skirt.


Line up the top edge of the skirt with the bottom edge of the yoke, adjust the gathering as needed, and pin the right sides together. If you didn't heed my advice last time and skipped the pinning, then at least heed my advie this time. The pin not only serve to keep the two edges aligned, they will help ensure the gathering remains even.

If you measured correctly with the basting lines, then you should be sewing between them when you sew the skirt and yoke together. (sorry again for the picture orientation - can't seem to get blogger to cooperate with me)


Here you can see your seam line in between the basting lines. Now, you can pull those basting stitches out. I tend to leave the basitng line that won't show and only pull out the one that will. If you're not sure which one that is, turn your skirt right side out and you'll immediately see which one needs to come out. Go ahead and press and top stitch the seam down (pointed up toward the waistband).


Put a safety pin onto the edge of the elastic and feed it through that opening you left earlier. Bring the two ends together and overlap by approx 1 inch. Sew a line down on each side of the overlap. You really want this to be secure!

Feed the rest of the elastic into the casing and sew the opening closed (again, with the silly photo orientation!)

You've done it!! Step back and admire your hard work!!

Saturday, May 14, 2011

Knit Tutu Ballerina Dress for Waldorf Inspired Doll - pattern

Last year I designed a knit tutu dress for my 3 year old who desperately wanted to be a ballerina for Halloween. She absolutely loved it! Fast forward to this week and I thought it'd be fun to utilize my pattern for a custom ordered waldorf inspired doll. An evening of knitting and pattern editting and this is what I came up with. This is my first attempt at posting a pattern, so I hope its relatively clear.

This pattern is for a 14-15 inch waldorf inspired doll. The circumference of this doll at the waistline is approx 11 inches.

Yarn: Bernat Satin
Needles: Size 7
Gauge: 4"=18 sts in stockinette
Other supplies: 48 strips of tulle cut to approx 3" by 7"

Bodice (make 2):
CO 26 sts
Knit 2 rows in st st
Row 3: K1, *k2tog, yo, repeat from *, knit last st
Work 3 rows in st st
Repeat Row 3
Work in st st until piece measures approx 4.5" from cast on edge.

Shape Armholes:
Bind off 3 sts at beginning of next 2 rows (while maintaining st st pattern)
Next row: ssk, knit to last 2 sts, k2tog
Next row: purl
Work 2 more rows of st st

Shape Neckline:
K3, attach another skein or section of yarn, bind off 12 sts, knit remaining 2 sts (you should now have 2 separate sets of 3 stitches at each end of the piece, each with their own working yarn).
Work 3 rows of st st
Bind off remaining 6 sts.

Finishing:
Seam together the shoulder and side seams. Weave in ends.
Cut 48 strips of tulle to approx 3" by 7"
Hook a strip of tulle to each yo opening at the bottom of the dress to make the tutu. There are two rows of yo holes and tulle should be hooked through both sets of holes in order to ensure a nice, full tutu. Below is a step by step picture tutorial for how to do this.

Step 1: Fold strip of tulle in half lengthwise


Step 2: Feed the folded end of the tulle through the hole created by the yarn over


Step 3: Open the tulle at the fold line


Step 4: Grab the tails of the tulle strip and pull them through the opening created at the fold line


Step 5: pull tight


After both rows of tulle have been hooked through the yarn over spaces, you should have this result: